General Teaching Tips

Teaching over Zoom: camera angles

Front cam

Front cam

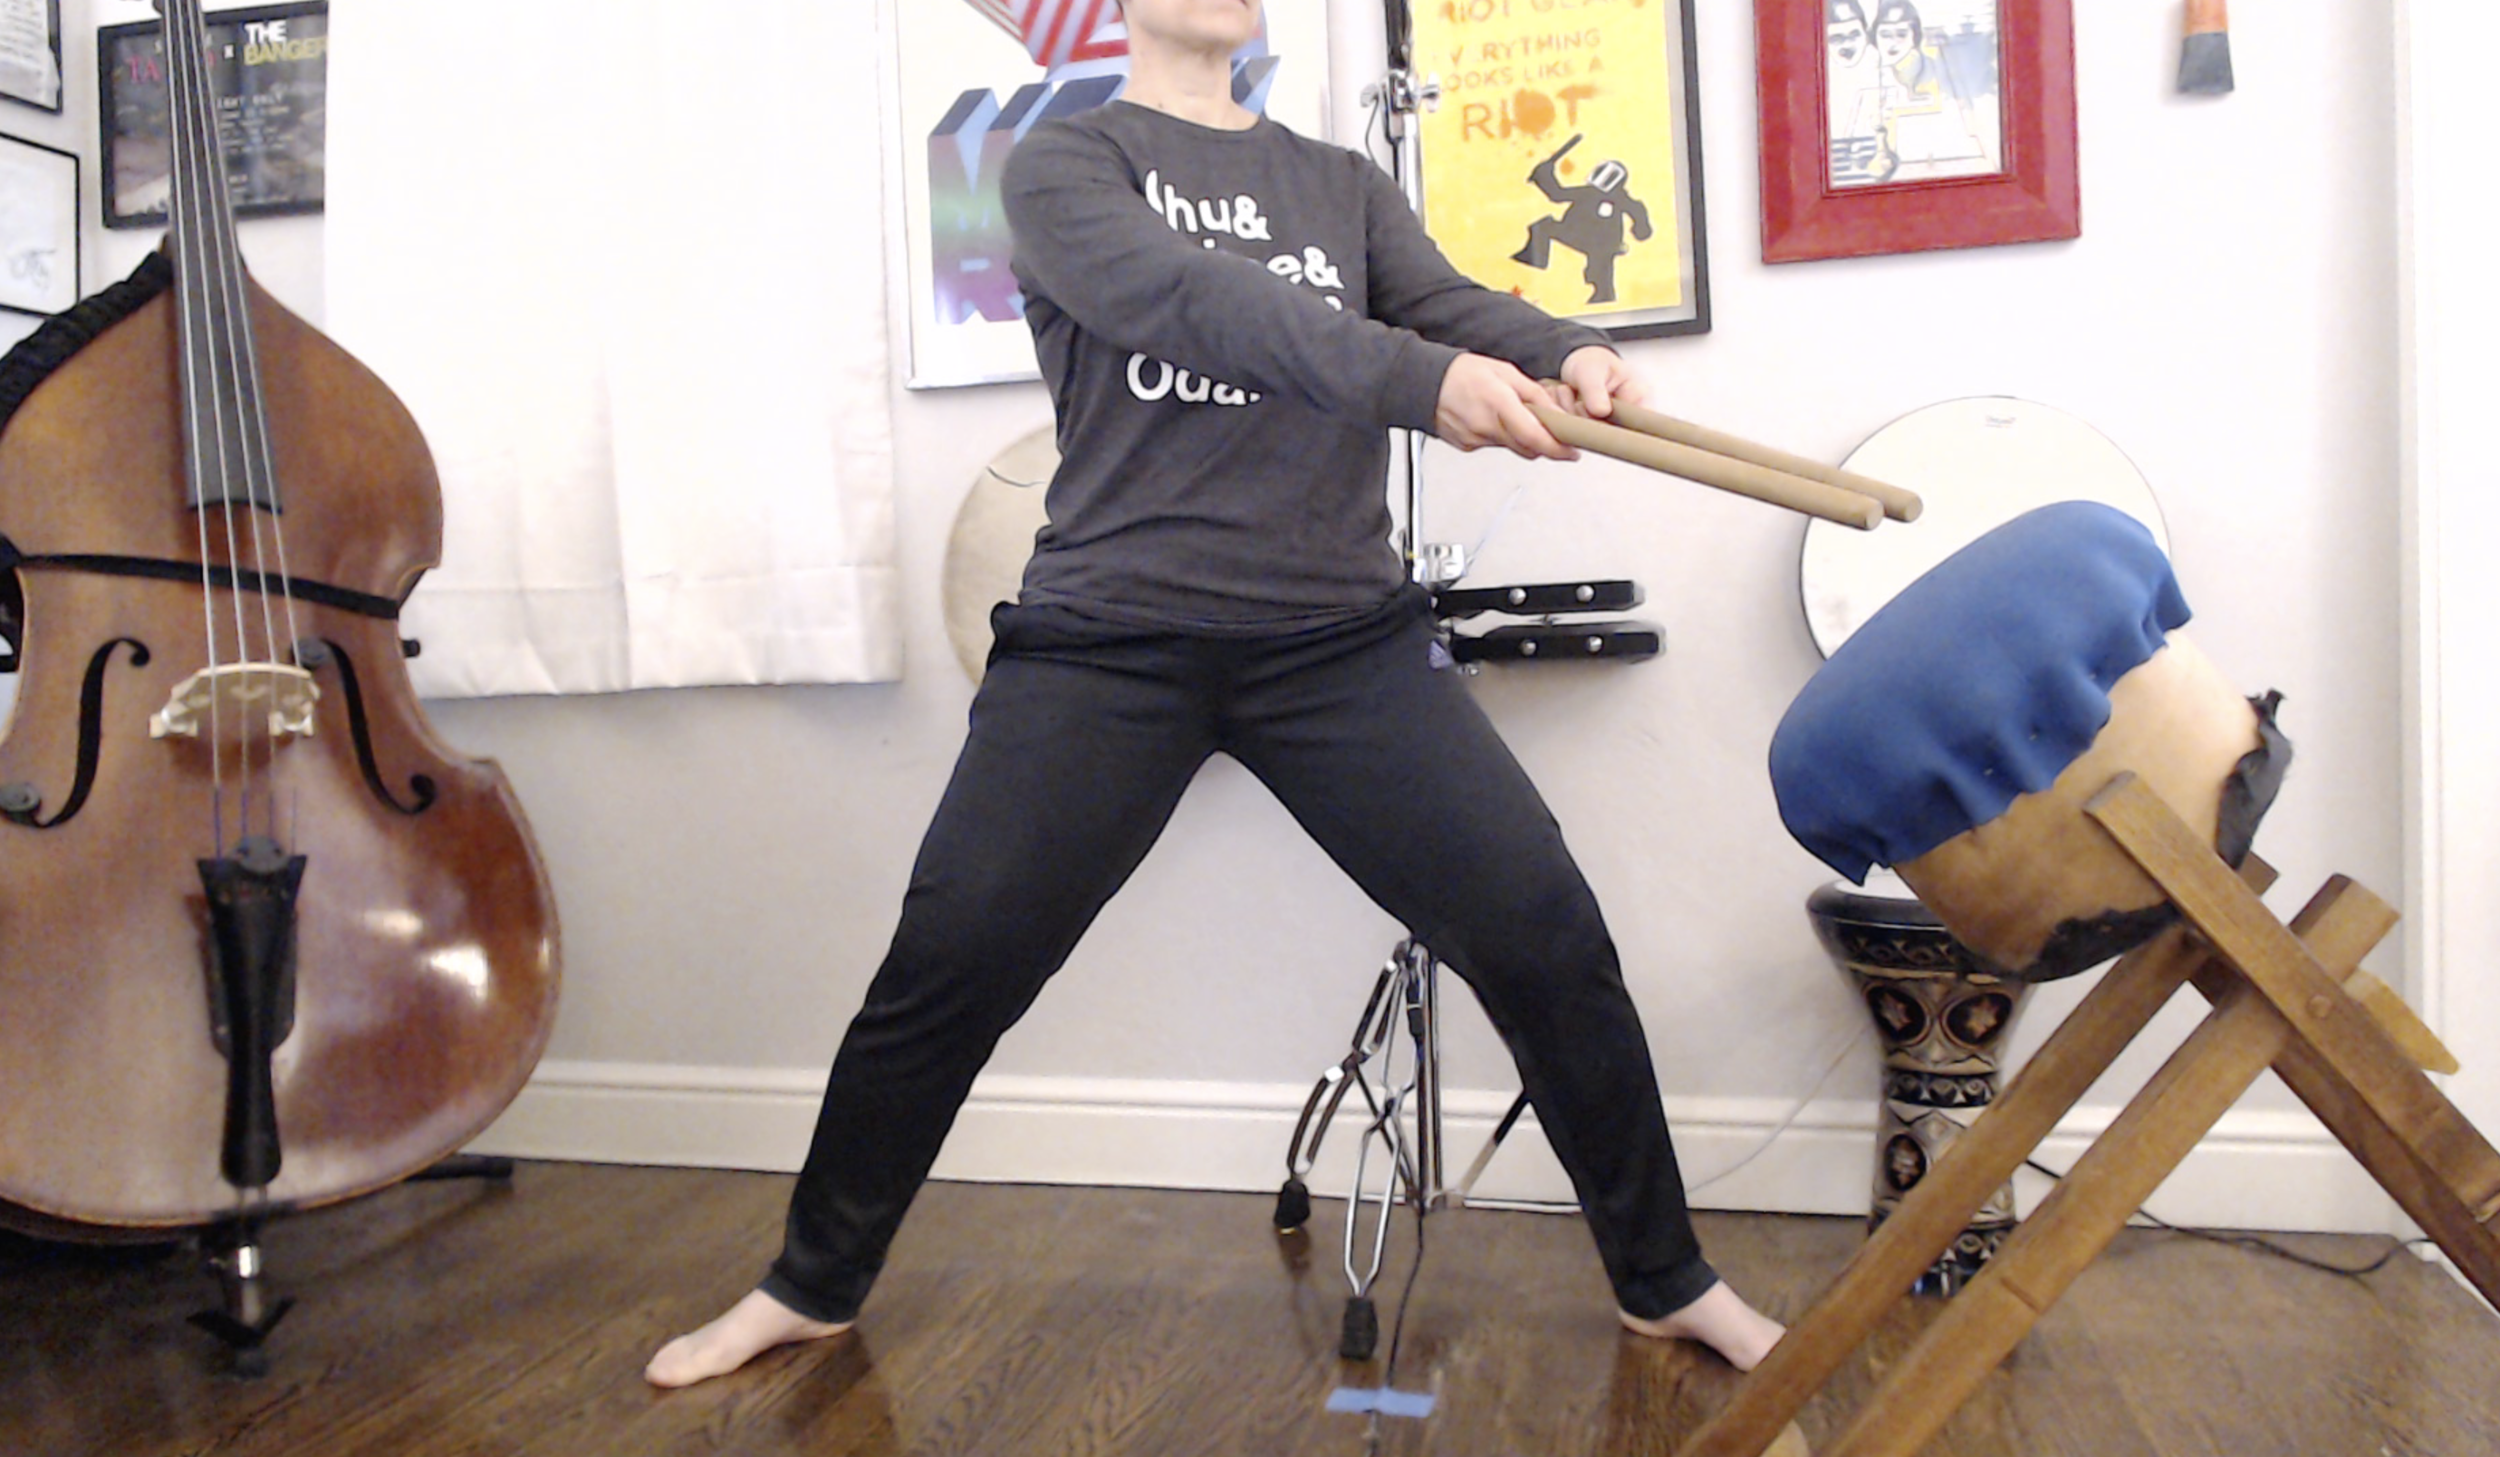
A teacher should make it as easy as possible for their students to learn. This can be tricky in Zoom classes. Chances are your students have a mix of visual processing styles, and you can (and should!) set them up for success by using multiple camera views. Kristin and I use a front cam and a sky cam in our Zoom classes, and recently added a foot cam as well. 

Sky cam

Sky cam

You don’t have to shell out for new webcams to do this. If you host your class meetings on a laptop, use the embedded webcam as your front cam, and your phone as your skycam. (Assuming you have a phone with a camera and wifi.) You’ll need to do a little creative problem solving to set up your skycam, but we’re teaching artists, we eat creative problem solving for breakfast! Kristin and I set ours up  by mounting a tripod cell phone attachment to a lamp extension arm, and then hooking that up to the top of a heavy percussion stand. It wasn’t pretty, but it worked!

Once the phone is in place, you’ll host the meeting on your laptop, and also call in as a participant with the cell phone. When you want to use the skycam, turn off your computer video and sound, mute your computer, unmute the phone, turn on the phone video, and spotlight the phone. Reverse these steps to switch back to the front cam. Leave the phone muted with video off unless you’re sky cam-ing. VERY IMPORTANT: You need to plug headphones into the phone to avoid the echo/feedback issue you get when two devices in the same room are on the same Zoom call.  

If you have some money to invest, buy a webcam and some USB extension cables. Then, put your webcam in your skycam mount and use the cables to connect it to the hosting computer. It’s much easier to switch between cameras when they’re both plugged into the same device (there’s even a keyboard shortcut to do this in Zoom) and you don’t have to do all that unmute/mute business.

Foot cam

Foot cam

We’ve found that people LOVE the sky cam, particularly when we’re introducing new drills and songs. Just this week we added a foot cam for our naname class. This view shows the teacher from chest down, providing a visual reference for foot placement, leg engagement, and koshi integration. I highly recommend adding this view if you’re focusing on kata or introducing a style people aren’t very familiar with.

Drop me a line if you have questions or want to talk through using multiple camera angles in your classes. Happy teaching!


Scaffolding: the secret of artful teaching

Scaffolding.jpg

Did you learn to ride a bike with training wheels? To read “cat” before “category?” Then you have experienced scaffolding! It’s the best way to teach ANY new skill, taiko included. If your students are struggling, it’s possible you aren’t properly scaffolding your material.

“Scaffolding” is supporting students while they build skills towards more complex capacities. For example, to learn Matsuri you need basic kuchishoka fluency, the ability to play patterns on beat, a working knowledge of basic kata, and to memorize the patterns. Teaching is most effective when you teach these skills over time, gradually stepping down support as students learn.

Good scaffolding for Matsuri would include exercises that introduce and build skill in kuchishoka (my Drills 1-2 would work, as would countless other drills in the taiko world). You should also include activities that help students learn to feel the beat; the way I teach songs organically incorporates an awareness of pulse and where beats fall. Of course you can’t forget about teaching kata, and you should definitely scaffold naname-uchi by teaching tachi-uchi first. 

Scaffolding is a key factor in artful teaching. Next time you’re planning a class, take a moment to look at the basic skills required to succeed in the class and evaluate if you’ve taught those skills yet. If you haven’t, take a step back and figure out how to scaffold them. It will take you a class or two longer to get to your goal, but your students will achieve much greater mastery over the material.

Feeling stuck? I can help! I’ve been at this for nearly two decades. Drop me a line to set up a consulting session, and happy teaching!

Landing your first residency

TullyTeach.jpg

In-school residencies can be a welcome source of revenue for a group or an individual teaching artist. Like any line of work, it can be hard to break into, but once you do, it becomes easier to get more of it. Here are some tips:

  1. Develop a one-pager.

    This doc should explain how your program will benefit the students and the school receiving the residency. Keep it to one page and make sure there’s lots of “air” on the page. Bulleted lists and 2-3 paragraphs with spaces in between them are good; a solid wall of text is not. The Americans for the Arts has a TON of research on the benefits of arts education and is a good starting point. This one-pager should guide the conversation in meetings with teachers and principals, and you should leave a copy with them at the end of the meeting.


  2. Leverage your existing network.

    When I was a taiko newbie, my group performed at an elementary school where a member’s granddaughter was a student. Her teacher LOVED the performance. The following year, I approached that teacher about a residency and she was immediately an advocate. She convinced the rest of the teachers at her grade level and the principal, and we did a residency there the following year.

    I landed my first residency after moving to the Bay Area when a taiko friend mentioned that another friend had just passed on a residency. The first friend connected me with the person booking the residency and they booked me right away because I came to them through a recommendation.

    The lesson here: be social. Make friends. Hang out with them. Go to events. Let people in your orbit know you’re looking for residency work.


  3. Find your own funding.

    Schools rarely have the money to fully fund an artist-in-residence program. Many states have a statewide arts agency that offers partial grants to help cover the cost, but schools don’t always know about this resource. Do your research beforehand, and bring at least one grant opportunity to the school to help cover your fee. Some states require that the school be the applicant, so it’s very helpful to the school if you can provide grant language they’ll need to put together a proposal.


  4. Residencies attract more residencies.

    Just like performances attract more performances, completing even one successful residency is a strong indicator that more will come your way. Kids talk to parents, parents talk to neighbors and co-workers, teachers talk to peers at other schools. This word of mouth is likely to bring you more work.


Don’t give up if it takes months or even a year or two to land your first residency - more will almost certainly follow. Of course, the stronger your program, the easier it will be to find additional work. I can help - contact me for support in creating a great in-school residency. Happy teaching!


Questions a taiko teacher should ask

blog 10q.jpg

If you’ll be teaching more than one session in a school, you’ll probably have a planning meeting with the teachers you’ll be working with. The principal may attend too. Below are 11 questions you should definitely ask. These aren’t necessarily in order of importance, so ask them all! The answers will help you successfully launch your classes.

1. How big is the room where I’ll be teaching? What else is this room used for?

You want to make sure they’re not putting you in an unused classroom that’s full of desks. If it’s a room that’s used for other activities, you want to make sure your drums will be safe when you’re not there. Ask if you can see the room after the meeting ends.

2. Are there any adjacent classrooms?

If a school plans to put you in a room with an adjacent classroom, make sure they understand how loud taiko can be.

3. Is there secure storage? Can I see it?

Note, secure doesn’t HAVE to mean locked. In many schools, the stage in the cafeteria is a very low-traffic area and a safe place to store drums.

4. What time does the school day start and end?

Most school parking lots are bedlam during drop-off and pick-up (about 10 minutes before and after beginning and end of the school day). Do yourself a favor by avoiding these times.

5. Are there English Language Learners in the classes?

As taiko teachers, we’re lucky that kids can succeed in our classes without understanding every single word we say. Still, I find it’s helpful to know if there are a lot of ELL students so I can be sure to physically demonstrate a lot and talk as little as possible.

6. Are there special needs students in the classes? If so, what accommodations do they need?

Make sure you can provide these accommodations and be up front if you can’t. It’s a good idea for students with sound sensitivities to wear their headphones to class.

7. How many students are there in each class?

I’ve had 23-32 students in a class, which translates to enormously different equipment and space needs.

8. How much in-school music instruction have the students had before now?

I’ve had answers ranging from “none” to “multiple years,” which greatly affects my lesson planning.

9. Will the classroom teachers be staying in the room with me and their students? If so, will they be participating?

If you’re not certified, the classroom teacher will usually stay in the room with you, but not always. Even if they stay in the room, they may take advantage of the opportunity to catch up with grading or other tasks. It’s important to know the school’s expectation is of their teachers.

10. Are any of the following scheduled during the residency: fire drills, field trips, assemblies, or other special programs that might affect the schedule?

Schools schedule these kinds of things months in advance, but often don’t think to mention them to a teaching artist. It’s up to you to ask!

11. Do you have a method you use in your classroom for student participation or behavior?

Some teachers use popsicle sticks with student names on them to promote participation, or marbles in a jar as a behavior incentive, or other classroom management techniques. It’s useful to know these beforehand so you can fold them into your classroom management. (See this post for more detail.)

If you have questions or need advice on planning a successful taiko education program, drop me a line. I can help. Happy teaching!

10 practical tips for taiko teaching artists

DSCF0001.JPG

Taiko teaching artist is the best job I’ve ever had. It’s also the hardest job I’ve ever had. Here are 10 things I’ve learned over the years that make teaching taiko in schools easier.

  1. Make friends with the Office Manager and Custodian.

These folks have difficult and under-appreciated jobs. At the same time, they can be highly influential on your residency’s success. An office manager who feels valued by you will call teachers who haven’t shown up for class, or make an announcement to remind teachers to bring whiteboards. A custodian who feels valued will make sure students don’t mess with your drums when you’re on break. They are critical allies. Learn their names. Smile at them. Thank them. Give them a Starbucks gift card. It will make your life easier. (Depending on your school, the office manager may also be called the secretary or receptionist.)

2. Store your drums at the school.

Teaching by yourself is hard, and if you have to load in and out of the school every day, it’s close to impossible. If a school can’t provide you with secure storage for your equipment, don’t take the residency. It won’t be worth it.

3. Load in BEFORE your first day.

Your first day is hectic enough without also having to load in all of your equipment.

4. Set your class up in curved rows, not a circle.

If you’re in the middle of a circle, some students will always be facing your back. If you join the circle, kids at your 2 o’clock and 11 o’clock will have trouble seeing you. With curved rows, all students will have a good view of your face and will be better able to hear you.

5. Avoid residencies that are folded into after-school programs.

Taiko is fun! Taiko is loud! Taiko is exciting! The structure of the regular school day, along with good classroom management, can help even the most excited kids stay focused. After-school programs (aka after-care) are far less structured and it’s too hard to avoid chaos when teaching taiko in them. Do yourself a favor and don’t accept a residency if it’s incorporated into an after-school program. (But by all means, if you have your own studio and the students come to you, offer taiko classes after school. That’s a different thing all together.)

6. Have students help you clean up.

Students as young as 2nd grade can reliably handle the responsibility of packing drums and putting them back in their storage spot. Ask your last teacher of the day to leave you 5 kids to help pack up. They’ll LOVE doing it, and it will make your life easier.

7. Include classroom teachers.

Just like the Office Manager and Custodian, a classroom teacher who feels valued is a powerful ally. Their enthusiasm about your classes will shape the students’ enthusiasm. Email your lesson plans to classroom teachers in advance, give them the opportunity to participate, let them teach any arts integration you’re incorporating. Also be sure and send them your bio before you start so they understand that you’re a competent professional coming to enrich the education of their students.

8. Informance, not performance.

Schools are likely going to ask for a performance at the end of your residency. I always suggest having the last class be an informance instead and schools almost always go for it. For an informance, I invite the students’ families to come watch the last class. I guide the kids through the activities they’ve learned (which always includes at least one song) and pause regularly  to explain to the “audience” what skills the students just demonstrated.

Families LOVE this: they get to watch their student the whole time, rather than attending an evening performance where multiple classes perform. Teachers LOVE this: they don’t have to come back to school for an evening event after a long day. Kids LOVE this: it’s lower stakes than a performance, they still get to show off, and they’re in the spotlight the whole time. I LOVE this: it doesn’t add an additional event to my scope of work and I can focus the entire residency on skill building rather than creating a performance product.

9. Allow for mistakes (your and theirs).

Most students aren’t going to immediately succeed. Don’t get frustrated. Find different ways to practice skills and keep at it. They’ll learn. (This is why I have umpteen pulse activities.)

The same is true of you as a teacher. You’re not going to succeed all of the time. Some activities will fall flat. You’ll accidentally say “don” when you mean to say “su.” You’ll forget that the school changed your schedule one week and you won’t show up on time. I’ve done all of these things. It’s not awesome, but the more you can dust yourself off and try again the better your mental health will be. Bonus: if you can dust yourself off and try again in front of your students, you’re modeling for them a growth mindset, which is something kids need to see.

10. Get rest.

Teaching is exhausting. It makes you WAY more tired than just playing taiko. Get your rest and eat your Wheaties on teaching days. If you drink alcohol, don’t drink the night before a teaching day. Alcohol messes with your sleep and a restless night = a rough teaching day.

There you have it! The top 10 things I wish I’d known when I started teaching. I hope they’re helpful to you. Happy teaching!


The Critical First Day: Establishing Expectations, Pt 2.

One size does not fit all! You can't treat 4th and 5th graders the same way you treat K-3 students. This post continues the discussion I started last week on setting your students (and yourself) up for a successful residency.

With 5th graders, I ask them about their classroom or school rules, and then say that those rules apply in the taiko classroom too. The video on the right shows me holding this conversation with a 5th grade class I started working with recently. Bonus, it also includes the system I use for randomly selecting kids to participate. More detail in a future post, but it’s much more effective than asking for volunteers to answer questions! (4th and 5th graders tend to know what number they are in their classroom.)

For consequences in 5th grade, I just calmly name rule breaking if I see it. (“You’re talking to your neighbor while I’m talking. That’s disrespectful.”) I’ve had good luck with students changing behavior when I do that. Mind you, they’re not happy for a few minutes, but they almost always come around and act more appropriately in the future. This doesn’t require any particular introduction on the First Day, just do it when it happens. Take note: you erode student confidence and trust in you if you show frustration at moments like this, so work on your poker face.

With unruly classes, I’ll use a Check/X system to give them a visual reference for how they’re doing. They get a green check on the board when they’re meeting behavioral expectations, and a red X when they don’t. It’s basically the same as the happy face/sad face system I use with K-3, but adapted for older kids.

Fourth grade is a wild card. Less mature classes thrive under the chant/happy/sad face system, and more mature classes will roll their eyes at it. I usually start with the 5th grade strategy in 4th grade. If that doesn’t work, I switch to to the K-3 strategy.

Middle school is an entirely different ball game. Email me if you teach middle school and want some tips. Until then, happy teaching!


The Critical First Day: Establishing Expectations

I started two residencies this week, and it reminded me how “make or break” the First Day is. A good First Day lays the foundation for a successful residency; a bad one truly sets you back. In honor of my newest residencies, I’m starting a series of posts about building a First Day that will set you up for a successful taiko class.

Three critical things happen on the first day. This post talks about #1: the students learn your behavioral expectations. I talk about K-3 strategies here and will talk about higher grades next time.

The winning strategy with all grades is to set clear expectations and be consistent and immediate with consequences AND with reinforcement when kids do well. With K-3 students, I teach a rules chant on the first day. The video shows me introducing these rules as a chant to a new 2nd grade class.  

(Note, these rules work for me, but if they don’t feel like a fit for you, Google “music classroom rules” for literally thousands of examples.)

I introduce the chant on the First Day, and then it becomes our focusing activity for the rest of the residency. At my schools, students walk from their regular classroom to the room where I’m teaching. Never underestimate how completely a walk across the school campus can derail a kid! They absolutely need an activity like this to focus when they get to you. These kids will say the chant every week at the beginning of class, and they’ll have it perfect by Week 4.

Rules aren’t effective unless there’s a consequence for breaking and positive reinforcement for following. For my K-3 classes, I draw a happy face and a sad face on the whiteboard. When the majority of the class follows a rule (i.e., everyone listens the whole time I’m giving directions) I put a check under the happy face. When a rule is broken, I put a check under the sad face. At the end of class, I make a big deal of having the happy face checks cancel out the sad face checks. I introduce this system in the latter part of this video. Kids this age really respond to this approach!

Lots of classroom teachers have some kind of behavior reward system in their classrooms. (For example, they put marbles in jar when the class shows good behavior. When the jar is full, the class gets a pizza party or something). See if the teachers you’re working with have a system like this and if they’re willing to tie behavior in taiko class to their existing system (i.e., they put a marble in the jar if the class has more happy face checks than sad face checks in a day, and take one out if the reverse if true).  

That’s it! Next time I’ll talk about establishing expectations with older students. Although my focus is on in-school taiko programs, this approach can be easily adapted for out-of-school programs. Contact me if you want some suggestions for that. Until then, happy teaching!


Introducing New Songs: Method 1

There are a lot of ways to teach new songs to your students. Kristin and I have different “go-to” methods we rely on. This week I’m writing about mine; in a future post, she’ll introduce hers.

My method is adapted from my Orff training. Under the Orff method, students learn music much the way humans learn language - through listening, repeating, getting it wrong at first, learning from mistakes, and repeating the process until they’ve got it. It’s active learning that, over the long haul, builds real ownership of the material and a capacity for creative risk-taking. It’s a great way to teach kids and adults and it’s a great way to teach taiko.

The steps are below. I usually stop between steps and take questions, or if I see people struggling in a way that indicates lack of understanding. I don’t usually stop for struggling that reflects the normal effort of memorizing a new pattern.

The video on the right shows all of the steps. It’s just under 3 minutes long, but the full process takes 10-20 minutes, depending on how long a phrase you’re teaching and how quickly your class learns.

1. Introduce the full phrase while tapping on your body.

Use whatever phrasing is natural in the song you’re teaching. In the video, it’s 4 measures, which I find to be a good length. Tap your shoulders and legs to show where the pulse of the phrase is.

In the video, I’m teaching the tag from Sanae Swing, one of my beginner songs. Note that I tell the students what I’m going to do before I do it. This kind of signposting is helpful for most types of learners.

2. Break the full phrase into smaller sections and echo teach them.

Get students copying you on the body tapping. Then say “First me” and say a small section of the phrase. After you finish, say “Now you.” Students say that same section back to you. Keep tapping the entire time.

They will not get it right the first time - they’re not supposed to! They’re supposed to do their best. Don’t stop when they make mistakes. Just say “First me” again, repeat the section, and say “Now you” for them to echo again. Keep this up until about ⅔ of them are getting it right about ⅔ of the time (the ⅔ ⅔ rule).

3. Keep adding small sections until you’ve introduced the entire phrase.

Once you hit the ⅔ ⅔ mark on the first section, add the second. This time, DON’T signpost. Just do it. In the video, I add a third section because the class had gotten to ⅔ ⅔ on the first two sections.

I can’t say it enough: don’t wait for everyone to have it perfect before you add the next section. You have to allow for things to be imperfect in this process; imperfection is a natural step in learning. Aim for ⅔ ⅔ and then add on.

4. Show sticking.

Once you’ve introduced all sections and hit ⅔ ⅔ on the full phrase, teach the sticking. Either turn your back to students when you do this or mirror the sticking if you’re facing them (i.e., use your left hand for right hand hits) so highly visual learners don’t get confused.

Change to a count of “ichi ni so-re” to start rather than First me/Now you. It prepares students for the next step.

As you did with the echoing, go over the sticking for one section several times. Add on the next section when you hit ⅔ ⅔. Keep that up until you’ve taught all of the sticking.

5. Build the phrase by sections on the drums.

Have students go to their taiko. Add the jiuchi. Build up the full phrase by sections, as you did with the echo teaching and sticking. Count in by “ichi ni so-re.” Add a new section when you hit ⅔ ⅔. In the video, the class is working on sections 1 and 2.


If you follow these steps, by the time you’ve built up the whole pattern on the drums, students have said, played, or air-bachied (that’s a word, look it up) the phrase 30-50 times. This is enough repetition for many students to have memorized it. Note, we don’t touch drums until Step 5.

This method is harder for visual learners. For this reason, I encourage students to write down what they’ve learned when we take a break and check it with me to make sure they’ve got it right. I don’t let them read from this paper as we play, however. Visual learners CAN succeed with this method, it just takes a little more time and a little more support from the teacher during breaks.

If you use this method, let me know. I’d love to hear how it works for you. Happy teaching!


If you fail to plan.…

pic for lesson planning post.jpg

Planning your lessons in advance takes time, but it’s time well spent. It’s the difference between mediocre classes and students liking taiko more than recess. (TL;DR? Here’s a template you can use, and see you next post.)

There are lots of different ways to approach planning lessons. Here are two tips I’ve found helpful over the years.

  1. Plan your objective first.

You need to have a clear idea of what you want your students to understand or be able to do at the end of your class. Is this session about kuchishoka? Form? Learning a song? Building fundamentals for soloing? It doesn’t have to be just one thing, but it needs to be spelled out clearly. Begin with “By the end of this class, students will…” and then complete the sentence. (You can leave out the “by the end of this class” if it feels too wordy - I usually do).

2. Keep your students active.

When I was teaching in Japan, I was introduced to this format for lesson planning. I loved it, and still turn to it today. (Here’s an example of a lesson I planned using this format. Both “teacher” and “teaching artist” refer to the instructor leading the class.)

Try using this format to plan your next class. If you see a lot of “listening” or “watching” and fewer active verbs (i.e., drumming, chanting, moving, etc.) change up the lesson so students are more active.

A general rule of thumb: for K-1 students, you need to change activities at least every 5 minutes, or even more frequently. For 2nd and 3rd graders, change every 7 (ish) minutes; for 4th-5th graders, change every 10-15 minutes. Gr. 6 and up can easily spend 45 minutes and more on an activity, as long as they’re actively involved in their learning.

This means you have to have a lot of activities ready for lower grades and that it will take you several classes in a row to complete an extended activity. This is a great approach! It gives students a week to absorb information and experiences before moving on to more complex steps, which greatly increases success.

If you have any questions about a specific lesson you’re working on, feel free to email me. Happy teaching!